Vehicle utility racks, such as roof racks, hitch bike racks, cargo racks, and kayak racks, are invaluable for expanding your vehicle’s storage capacity. However, encountering problems with your rack can be frustrating and potentially compromise safety.
We created this helpful guide to provide some answers and solutions to common issues that may arise with your utility rack.
1. Identify the Issue
Identifying the problems and finding appropriate solutions are the first steps when troubleshooting your utility rack. Listed below are some of the most common issues that you might experience.
Installation-related Problems
When you suspect an installation issue, carefully review the installation instructions provided by the rack manufacturer. Look for any steps you missed or components that might be incorrectly installed.
Pay close attention to the following:
- Proper alignment of brackets, clamps, or mounting hardware.
- Secure attachment of the rack to your vehicle’s roof, hitch, or other mounting points.
- Adequate torque on bolts and screws.
Stability And Shifting Of The Rack
If you notice excessive movement or instability of the rack while driving, it could indicate several underlying issues:
- Loose or faulty mounting hardware: Check for loose bolts, brackets, or screws to connect the utility rack to your vehicle. Make sure to follow the manufacturer’s instructions when fastening all components properly.
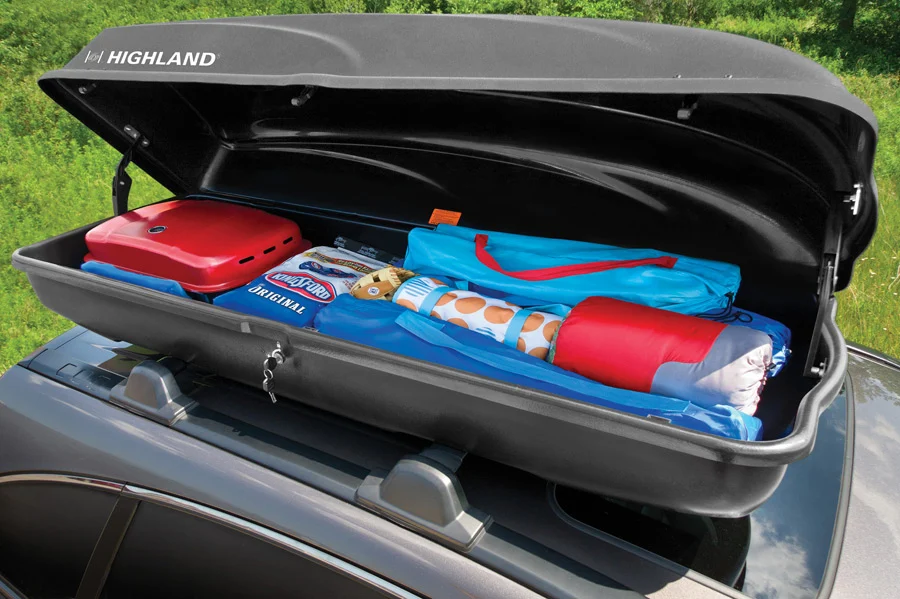
- Poor weight distribution: Poor weight distribution on the rack can cause imbalance and instability. Ensure the cargo load is evenly distributed and centered on the rack.
- Insufficient padding or cushioning: Inadequate padding between the rack and your vehicle may cause rattling and vibrations. If you find any missing or worn-out rubber pads, foam blocks, or gaskets, replace them immediately.
Vehicle Utility Racks Load Capacity Issues
Overloading your rack can lead to structural damage, instability, and compromised safety.
To identify load capacity issues:
- Review the manufacturer’s guidelines: Determine the maximum weight limit specified by the rack manufacturer. It is usually provided in the user manual or the manufacturer’s website.
- Weigh your cargo: Measure the weight of your gear by using a scale. The loaded weight should never exceed the carrier’s load capacity. Consider both the weight of the rack itself and the weight of the equipment you are carrying.
Security and Cargo Stability
Problems related to the security of your cargo can arise if it is not properly secured to the rack.
Signs of inadequate security include:
- Unwanted movement or shifting of the gear during transit.
- Loose or improperly tightened straps, clamps, or tie-downs.
- Insufficient support or pressure on the cargo.
To identify security issues:
- Inspect the attachment points: Check if straps, hooks, or other attachments are securely fastened to the rack and properly tightened.
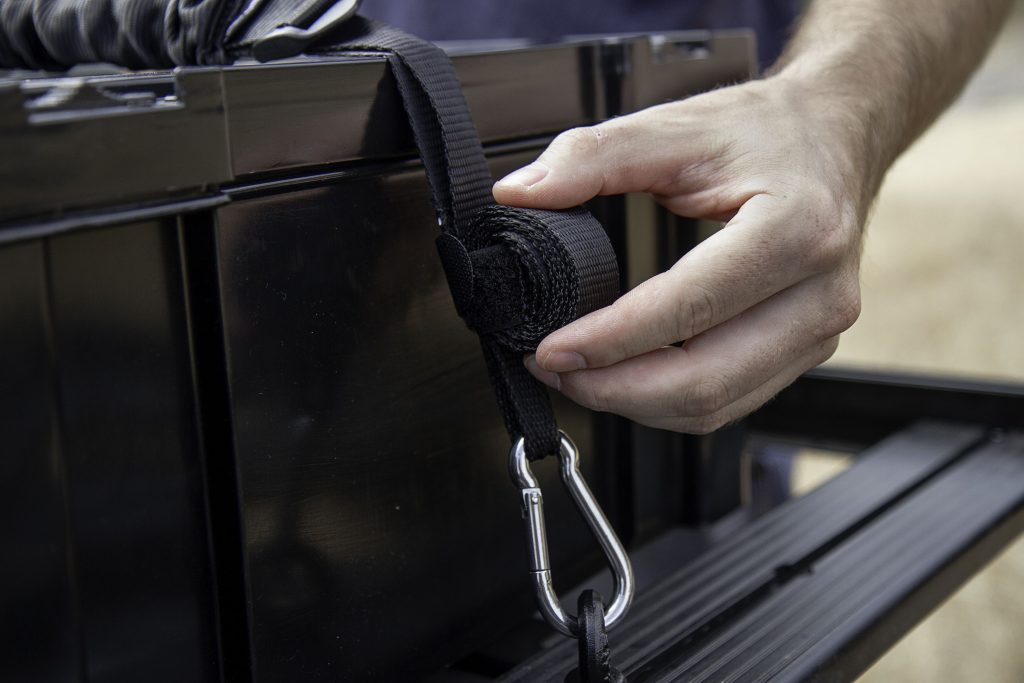
- Evaluate strap conditions: Look for signs of wear, fraying, or damage on the straps. Replace any worn-out or compromised straps to ensure proper tension and security.
- Verify support and pressure: Assess if the cargo is properly positioned and adequately supported by the rack. Adjust tie-down points or add additional support if needed.
By properly identifying the issue, you can proceed with the appropriate troubleshooting steps, ensuring safer and more effective use of your vehicle utility rack.
2. Check Installation
A thorough inspection is crucial if you recently installed your rack or suspect an installation-related problem. Review the installation instructions provided by the manufacturer and verify that the rack is correctly attached to your vehicle. Examine for any loose bolts, brackets, or signs of improper installation. Ensuring a solid foundation is essential for overall rack stability and safety.
Review the Manufacturer’s Instructions
Refer to the installation manual or guide provided by the rack manufacturer. Familiarize yourself with the specific requirements and recommended procedures for installing the rack on your vehicle. Different rack models may have varying installation methods, so it is important to follow the instructions specific to your rack.
Verify Compatibility
The rack you have chosen should be compatible with your vehicle, naturally. To ensure this is the case, look at the manufacturer’s guidelines in the manual or their website. Improperly sized or incompatible racks can lead to installation difficulties and compromised safety.
Assess Mounting Points
Inspect the mounting points where the rack attaches to your vehicle. This will vary depending on your rack types, such as roof, hitch, or trunk-mounted.
Pay attention to the following:
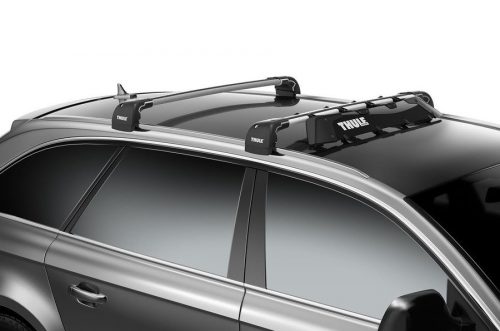
- Roof Racks: Examine the roof rails or fixed points where the rack connects. Look for signs of damage, corrosion, or wear. The mounting points should always be sturdy and in good condition.
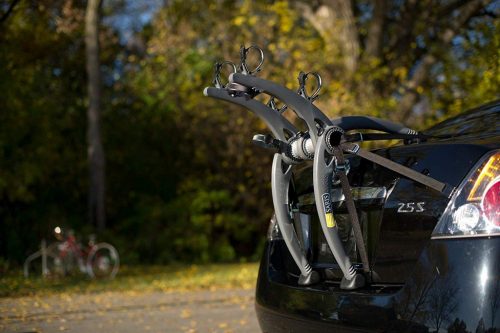
- Hitch Racks: Inspect the hitch receiver and verify it is the correct size for your rack. Ensure the receiver is free from debris or obstructions that could interfere with the installation.
- Trunk-mounted Racks: Check the trunk or hatch area where the rack attaches. Ensure the straps or hooks are securely fastened to the designated anchor points.
Confirm Alignment and Positioning
Proper alignment and positioning of the rack are crucial for stability and safety. Double-check the alignment of the rack’s components, such as crossbars or arms, to ensure they are parallel and evenly spaced. Verify that the rack is centered and balanced on your vehicle.
Tighten Bolts and Screws
Always ensure all bolts, screws, clamps, and brackets are securely tightened according to the manufacturer’s specifications using the correct tools to achieve the recommended torque values.
Test Stability
After installation, gently shake or apply slight pressure to the rack to test its stability. It should feel solid and not have any noticeable wobbling or movement. Double-check the installation steps and tighten any loose connections if you detect any instability.
Seek Professional Help (if needed)
If you encounter difficulties during installation or are unsure about any aspect of the process, consider seeking professional assistance. A qualified technician or installer can provide expertise and ensure the rack is properly installed.
By meticulously checking the installation of your vehicle utility rack, you establish a solid foundation for safe and effective usage. Reviewing the instructions, verifying compatibility, assessing mounting points, and ensuring proper alignment will provide a secure and reliable rack system.

3. Inspect Mounting Points
When troubleshooting problems with your vehicle utility rack, inspecting the mounting points is crucial for ensuring a secure and stable attachment. Properly examining these points will help identify any potential issues that may compromise the functionality and safety of your rack system.
Here are detailed steps to follow when inspecting the mounting points:
Roof Racks
- Roof Rails: If your vehicle has factory-installed roof rails, closely examine them for any signs of damage, corrosion, or wear. Check for loose or missing bolts, cracked plastic covers, or bent rails. Replace or repair any damaged components according to the manufacturer’s recommendations.
- Fixed Points: Some vehicles have fixed points designed for roof rack attachment. Inspect these points for integrity and ensure they are free from debris or blockages that could hinder installation. Confirm that the fixed points are securely fastened and show no signs of damage.
Hitch Racks
- Hitch Receiver: The hitch receiver on your vehicle should be the correct size to fit onto your utility rack. Remove any rust, debris, or obstructions on the receiver that may hinder installation.
- Locking Mechanism: Check that the locking mechanisms are functional by checking and testing that the lock engages and disengages smoothly and that the key is in good working condition.
Trunk-mounted Racks
- Anchor Points: For trunk-mounted racks, carefully inspect the anchor points where the straps or hooks attach to your vehicle. Verify that these points are structurally sound and securely attached. Look for any wear, tear, or fraying on the straps or hooks.
- Protective Padding: If you use protective padding, ensure it is properly in place and in full contact in the areas where the rack comes into contact with your vehicle. This will help to prevent scratches or damage to your vehicle’s surface.
Additional Considerations
Weight Distribution
When inspecting the mounting points, consider the weight distribution of your cargo. Ensure the load is evenly distributed on the rack to maintain stability and prevent excess strain on specific mounting points.
Anti-Rattle Devices
Some rack systems include anti-rattle devices or stabilizers to minimize movement and noise. Check if these devices are securely attached and functioning properly. Tighten or adjust them if necessary.
If you notice any issues during the inspection of the mounting points, address them promptly. Depending on the severity of the problem, you may need to replace damaged components, tighten loose bolts, or seek professional assistance. Ensuring the integrity of the mounting points is vital for a secure and reliable vehicle utility rack system.

4. Evaluate Load Capacity
Overloading your vehicle utility rack is unsafe and can lead to rack failure. Ensure you know the maximum load capacity for your carrier or rack. The rack manufacturer usually specifies this. It is important never to exceed it. Regularly assess the weight and distribution of your cargo to prevent strain on the rack and maintain stability.
Review Manufacturer’s Guidelines
Consult the rack manufacturer’s guidelines, either provided in the user manual or on their website, to determine the specified load capacity for your rack. Pay attention to any weight limits or restrictions mentioned, as exceeding these limits can lead to significant issues.
Consider Rack Components
Understand the load capacity for each component of your rack system, including crossbars, arms, or attachments. Different components may have varying weight limits, so ensure that you consider the cumulative weight of your gear distributed across the appropriate parts of the rack.
Weigh Your Cargo
To accurately assess the weight of your cargo, use a scale specifically designed for measuring heavy loads. Place each item or group of items on the scale and record their weights. Remember to account for the weight of any containers or bags used to transport the gear.
Calculate Total Load
Add the individual weights of all the items you plan to transport on your rack. Include every item meticulously; even small ones can contribute to the overall load. The total weight should not exceed the load capacity specified by the manufacturer.
Consider Dynamic Load
Remember that your cargo’s weight may increase while driving due to various factors such as wind resistance, acceleration, or vibrations. It is advisable to leave some margin within the load capacity to account for this dynamic load.
Distribute Weight Evenly
Ensure that the weight of your cargo is evenly distributed across the rack. Concentrated or unbalanced loads can cause instability, affecting the handling of your vehicle. Arrange the gear to balance the side-to-side and front-to-back weight on the rack.
Optimize Aerodynamics
Consider the aerodynamic impact of your cargo and rack configuration. Bulky or poorly arranged items can create excessive wind resistance, increasing fuel consumption and potential noise issues. Streamline the load by arranging items neatly and using fairings or wind deflectors, if applicable.
Regularly Inspect and Adjust
Frequently reassess the load on your vehicle utility rack, especially during long trips or transporting different items. Adjust as needed to ensure the weight remains within the specified load capacity and maintains proper distribution.
By carefully evaluating the load capacity of your vehicle utility rack, you can prevent overloading and minimize the risk of damage or accidents. Adhering to the manufacturer’s guidelines, weighing your cargo accurately, and distributing weight evenly will help maintain the stability and integrity of your rack system. Regularly inspect and adjust the load to ensure ongoing safety and optimal performance.
5. Assess Security Measures
Ensuring the security of your cargo is paramount when using a vehicle utility rack. Properly assessing the security measures will help prevent shifting, movement, or potential damage to your gear during transportation. Here are detailed steps to follow when assessing the security measures:
- Inspect Attachment Points: Examine the attachment points where your cargo secures to the rack. This may involve straps, tie-downs, clamps, or other fastening mechanisms. Check for the following:
- Condition of Straps: Inspect the straps for signs of wear, fraying, or damage. Look for cuts, tears, or weakened areas that could compromise their strength. If any straps show signs of wear, replace them immediately.
- Buckles and Fasteners: Ensure buckles, hooks, or other fasteners are in good condition and functioning properly. Verify that they securely hold the straps and provide reliable tension. Replace any damaged or broken fasteners.
- Tightness of Connections: Check the tightness of all connections, including straps, hooks, or clamps. Confirm they are adequately tightened and maintain a firm grip on your cargo. Adjust the tension as necessary to secure the load effectively.
- Evaluate Support and Cushioning: Assess the support and cushioning your rack system provides to protect your cargo and minimize movement. Consider the following:
- Padding and Protection: Look for padding or protection features built into the rack system. This may include rubberized coatings, foam blocks, or rubber straps. Ensure they are intact, free from deterioration, and properly positioned to prevent scratches or damage to your gear.
- Support Structures: Examine the design and construction of the rack to evaluate its ability to provide support and stability. Consider the spacing of crossbars, the strength of arms or attachments, and the overall rigidity of the rack. A sturdy and well-built rack will contribute to secure cargo transport.
- Verify Load Distribution: Confirm that your cargo is properly positioned and distributed on the rack. Unevenly distributed weight can lead to instability and potential damage. Follow these guidelines:
- Center of Gravity: Ensure that the center of gravity of your load remains balanced on the rack. Arrange the gear to maintain stability and prevent shifting during transit. Adjust the placement of items as needed to achieve an even weight distribution.
- Secure Individual Items: Securely fasten your cargo to the rack using high-quality ratchet straps, cargo nets, or bungee cords.
- Additional Security Measures: Depending on the type of cargo you are hauling, you may want to think about extra security measures, such as:
- Locking Systems: Some rack systems offer integrated locks or locking mechanisms to deter theft and secure your gear. Ensure that these systems are functioning correctly and use them when necessary.
- Cable Locks: Use cable locks to secure individual items or your gear to the rack. Pass the cable through handles, frames, or other secure points on your gear, loop it around the rack, or attach it to locking mechanisms if available.
Regularly inspecting and reassessing the security measures of your vehicle utility rack will help maintain the integrity of your cargo and ensure a safe and worry-free transportation experience. By paying attention to attachment points, evaluating support and cushioning, verifying load distribution, and considering additional security measures, you can minimize the risk of shifting, damage, or theft.

6. Examine Tie-Downs
Tie-downs are crucial in securing your cargo to the vehicle utility rack. It is essential to examine tie-downs thoroughly to ensure they are in good condition and properly installed.
Inspect Straps and Cables
Pay close attention to any signs of wear, fraying, or damage.
- Material Condition: Check the overall condition of the straps or cables. Look for signs of degradation, such as fading, stretching, or weakened areas. If the material appears worn out or damaged, replacing the tie-downs with new ones is important to ensure proper functionality.
- Fastening Mechanisms: Buckles, hooks, or other fastening mechanisms attached to the tie-downs should be in good working order. Verify the locking mechanisms function correctly, providing a reliable hold on the straps or cables.
Check Load Capacity
Verify that your tie-downs have an appropriate load capacity for your cargo. Refer to the manufacturer’s guidelines to determine the maximum weight the tie-downs can support. Exceeding the load capacity can result in inadequate securing and potential safety hazards.
Evaluate Length and Adjustability
Consider the length and adjustability of the tie-downs to ensure they can accommodate your specific cargo and your vehicle’s dimensions.
- Length: Determine if the tie-downs are long enough to secure your cargo to the rack properly. If the straps or cables are too short, they may not provide adequate tension or be difficult to attach securely. If necessary, obtain longer tie-downs that can effectively secure your load.
- Adjustability: Check if the tie-downs have adjustable features, such as buckles or tensioning systems. These allow you to customize the tightness of the straps or cables to ensure a secure fit. Ensure that the adjustability mechanisms function correctly and hold the desired tension.
Ensure Proper Attachment
Confirm that the tie-downs are correctly attached to the rack and your cargo.
- Rack Attachment: Ensure that the tie-downs are properly secured to the designated anchor points on the rack. Different rack systems may have specific attachment mechanisms, such as loops, hooks, or fasteners. Verify that the tie-downs are securely attached and will not be loose during transit.
- Cargo Attachment: Evaluate how the tie-downs connect to your cargo. Determine if they are attached to sturdy anchor points, handles, or secure gear parts. Avoid attaching tie-downs to fragile or unstable areas that may not withstand the tension during transport.
Test Stability and Tension
Test the stability and tension after securing your cargo and tightening the tie-downs. Push, pull, or shake the cargo to check if it remains stable and secure on the rack. Ensure that the tie-downs maintain the desired tension and that there is no excessive slack or movement.
Adjust and Retest
If you identify any issues during the examination, make the necessary adjustments. This may involve replacing damaged tie-downs, readjusting the length or tension, or securing the tie-downs to more appropriate attachment points. After making the adjustments, retest the stability and tension to ensure the cargo is properly secured.
By thoroughly examining tie-downs, you can identify any potential issues that may compromise the security of your cargo during transportation. Regularly inspecting and maintaining the condition of tie-downs will help ensure their effectiveness and provide peace of mind while on the road.
7. Check for Loose Parts
A thorough examination of your rack system should include inspecting all components for loose or damaged parts. Pay attention to brackets, crossbars, accessories, and mounting hardware. Tighten or replace loose or faulty components promptly to ensure stability and prevent potential hazards.
8. Listen for Unusual Noises
While driving, be attentive to any abnormal noises originating from your rack. Vibrations, rattling, or scraping sounds may indicate loose connections, misaligned parts, or insufficient padding. Address these issues promptly to prevent further damage and maintain a smooth and quiet ride.
9. Assess Aerodynamics
When assessing the aerodynamics of your vehicle utility rack, consider the following:
- Rack Design: Evaluate the shape of the crossbars and the presence of fairings. Opt for streamlined designs and ensure fairings are properly installed.
- Cargo Configuration: Place larger items towards the rear and secure them tightly. Consider using aerodynamic cargo carriers for bulky items.
- Minimize Wind Noise: Tighten connections, reduce gaps, and adjust fairings to minimize noise and improve aerodynamics.
- Test and Adjust: Monitor fuel efficiency, wind noise, and stability during driving. Make further adjustments as needed.
By optimizing the aerodynamics of your rack system, you can improve fuel efficiency, reduce wind noise, and enhance overall driving comfort.
10. Consult the Manufacturer
When troubleshooting issues with your vehicle utility rack, it is essential to consult the manufacturer for guidance. The manufacturer is a valuable resource that can provide specific insights, instructions, and solutions tailored to your rack system.
Locate Manufacturer Information
Find the manufacturer’s information on your vehicle utility rack, such as their name, contact details, and model or serial number.
Contact Customer Support
Contact the manufacturer’s customer support department through their provided contact information. This is often done by phone, email address, or an online support portal. Ensure you have the necessary information that the support tech might need, such as the model number, description of the issue, and any supporting photographs, if required.
Describe the Issue Clearly
When contacting customer support, clearly describe the problem you are experiencing with your vehicle utility rack. Provide details such as the symptoms, when the issue started, and relevant circumstances. This will help the manufacturer’s representative better understand the situation and offer appropriate assistance.
Follow the Manufacturer’s Guidance
Listen carefully to the guidance provided by the manufacturer’s representative. They may ask questions to gather more information or provide troubleshooting steps to address the issue. Follow their instructions diligently and ask for clarification if needed. They may also advise on potential warranty coverage, replacement parts, or authorized service centers if further assistance is required.
Provide Feedback and Documentation
After implementing the manufacturer’s guidance or resolving the issue, provide feedback to the manufacturer. Share your experience, including any positive outcomes or suggestions for improvement. This helps the manufacturer improve their products and customer support processes.
Maintain a Record
Record your communication with the manufacturer, including dates, names of representatives you spoke with, and details of the guidance provided. This record can be helpful for future reference or if the issue persists.
A Final Word
A well-maintained and fully operational vehicle utility rack is essential for safe and efficient transportation. This comprehensive troubleshooting guide has equipped you with a detailed framework to effectively tackle common issues that may occur with your rack system. Adhering to these guidelines guarantees optimal performance, safeguards your cargo, and improves road safety.

Marzanne is an active outdoors enthusiast with a passion for kayaking, hiking and camping. During summer months she dedicates the majority of her free time to ocean kayaking trails alongside all the beautiful beaches of Cape Town, South Africa. She combines her love for the outdoors with her creative pursuits such as wildlife and landscape photography.