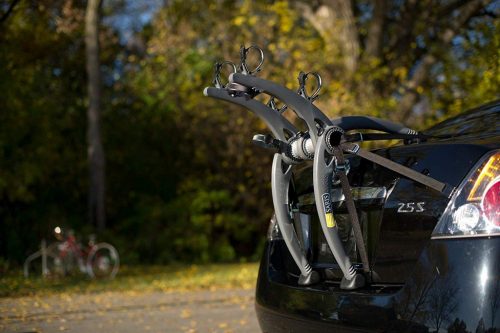
Keep your bike secure—and your paint job pristine.
You finally got your hands on a trunk-mounted bike rack. Great choice—it’s affordable, portable, and doesn’t require roof bars or a hitch. But now you’re standing behind your car, straps dangling, wondering: Is this thing going to ruin my paint?
Let’s not sugarcoat it—it can, if you don’t take the right precautions. But it doesn’t have to. With a little care and a few smart habits, you can use a trunk rack regularly without leaving behind scuff marks, dents, or that dreaded dull spot where paint used to shine.
Here’s how to do it right.
Start Clean — Every Time
This might sound obvious, but it’s the most commonly ignored tip:
Always clean both the car and the rack before mounting.
Even a tiny bit of dust, sand, or grit trapped between the pads of the rack and your car’s paint can turn into sandpaper on a bumpy road. You don’t need a full wash, but at the very least, wipe down the contact zones—trunk lid, bumper, and window—with a microfiber cloth.
Do the same for the rubber pads or feet on the rack. Grit stuck there gets pushed into your paint with tension from the straps, and that’s where most scratches happen.
Bonus tip: avoid using towels or old rags that could have dirt or debris stuck in them already. Clean microfiber only.
Use Paint Protection Film (or a DIY Alternative)
If you’re planning to use your rack frequently—or even just for a long road trip—consider applying a temporary protective film to your trunk’s contact zones.
There are a few options:
- Paint protection film kits, designed for this exact purpose.
- Clear vinyl wrap, which you can cut to size and apply like a giant sticker.
- DIY options, like blue painter’s tape or even cling film in a pinch.
It may not look glamorous, but it adds a buffer layer between your paint and any friction. Just make sure the surface is clean before applying anything. Trapping dirt underneath = scratches anyway.
Strap Down Smart (But Don’t Overdo It)
This is where a lot of people go wrong. They figure tighter is safer—and crank down on the straps until the whole trunk flexes. Not only does this stress your vehicle’s body panels, it can shift the rubber pads just enough to start rubbing under pressure.
So, what’s the right tension?
- Snug, not straining. The rack should feel solid but not cause panel flex.
- Test the movement: grab the rack and give it a shake. If it moves slightly but doesn’t rock or bounce, you’re good.
- Check after 10 minutes of driving. Straps settle. Retighten gently if needed.
Also, make sure the hooks are placed exactly where the manufacturer recommends—usually at the top, sides, or bottom edge of the trunk. Forcing them into a spot that sort of fits is a recipe for paint damage and metal stress.
Don’t Let Straps Flap or Rub
Ever heard a mysterious slapping sound on the highway? That’s usually a loose strap flapping in the wind—and if it’s hitting your paint, that’s a scratch waiting to happen.
Wrap up any extra strap length and secure it with a Velcro tie, twist tie, or even a rubber band. Make sure nothing is rubbing against the trunk, window, or bumper while you drive.
Also check for rubbing inside the trunk. Some hooks can shift slightly while you drive, and if they’re moving back and forth under tension, they’ll scrape the metal from the inside out.
Check Weight Limits (And Rack Fit)
Trunk racks are generally designed for 1–3 bikes max. Exceed that, and you’re putting way more pressure on your vehicle’s body than it was designed to handle. You also increase the chance of shifting during the drive, especially on curves and bumps.
Even if you’re within the weight limit, make sure your rack is:
- Compatible with your car’s shape
- Installed at the correct angle and height
- Balanced left to right with your bike load
A poorly fitted rack leans more on one side than the other. That’s not just bad for your car—it’s hard on the bikes and dangerous on the road.
Take It Off Between Trips
Look, we get it. Once it’s on, it’s tempting to leave it there. But if you’re not using it in the next day or two, take it off.
Here’s why:
- Sun and rain degrade straps over time
- Constant pressure from rubber pads can cause subtle paint fading
- Dirt and water trapped underneath will start to bake into the surface
It only takes five minutes to remove, and you’ll extend the life of both your rack and your car’s finish.
Final Thoughts
Trunk racks get a bad rap for scratching paint—but the truth is, user error is usually to blame. Mount it carefully. Keep it clean. Don’t over-tighten. Use protection if you’re in it for the long haul.
Do that, and your rack will carry your bikes, not wreck your paint job.
Read Also:

Willem is an avid mountain biker and outdoor sports enthusiast. For years, he has been riding mountain bike stage races, including the grueling Cape Epic. As a father of three adventurous kids, he knows about packing a vehicle to haul his gear safely and responsibly from home to any exciting weekend or holiday destination.